To set up MailDroid with Runbox, please follow the step-by-step instructions below.
Note that the setup process and dialog boxes on your computer may vary slightly from what is shown here, depending on what version of MailDroid you are using (these screen shots were made with MailDroid 3.53).
Contents
1. Get started
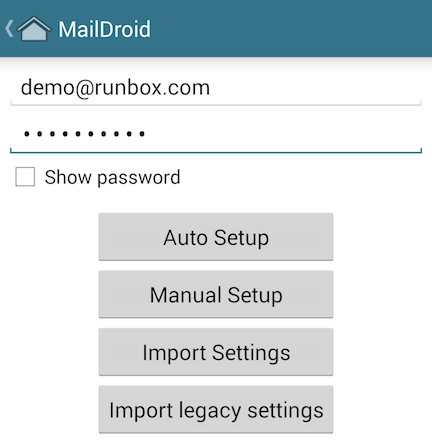
When you open MailDroid for the first time you will be asked to set up a new account. If you already have accounts set up you will need to go to Manage Accounts and then tap on the + in the top right to add a new account.
You will be shown the screen below. Enter your email address and password, then tap on Manual Setup.
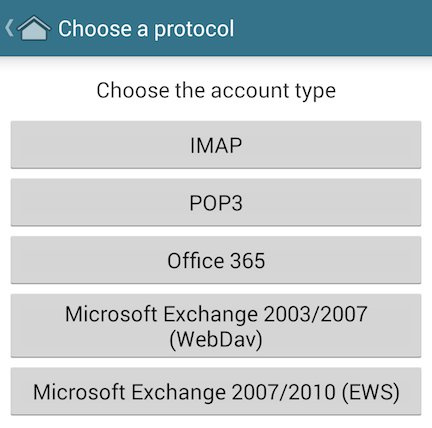
2. Choose the account type
You now need to select the account type. We recommend using IMAP as this allows your email clients to synchronise across all your devices and the webmail.
3. Enter the incoming and outgoing server details
Note: When you first create your Runbox account SMTP (outgoing mail) will be unavailable to you until you either a) validate your alternative email address (we send a validation link there when you create the account) or b) pay for a subscription. If you don’t do either of these things you will get a username/password error when trying to use our outgoing SMTP server.
Next enter the incoming and outgoing server details on the next screen. Be careful to enter them accurately and to enter your username in the correct format.
Incoming Mail Server (IMAP): mail.runbox.com
Outgoing Mail Server (SMTP): mail.runbox.com
Username: your primary Runbox email address (aliases cannot be used as log in usernames)
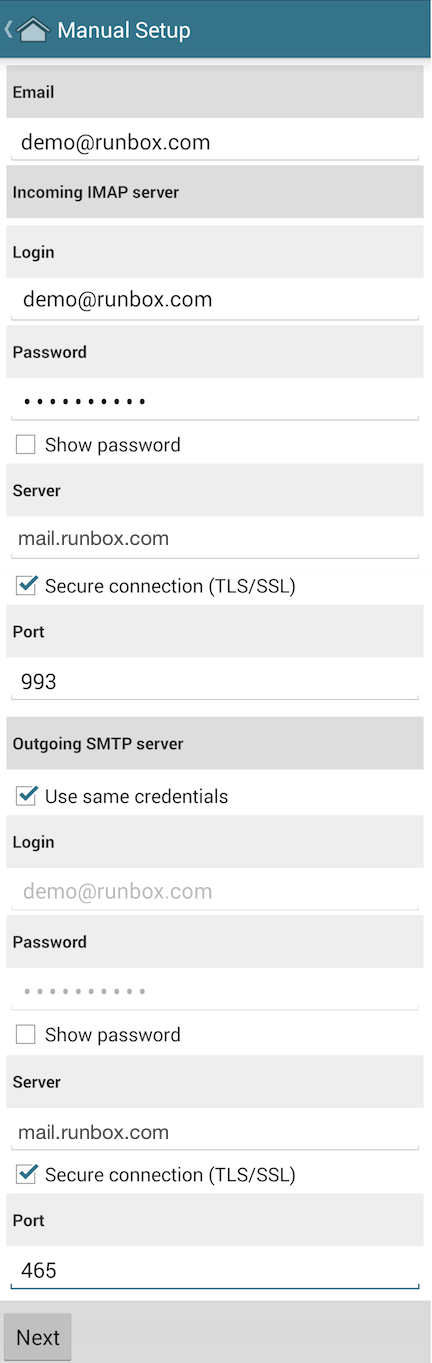
When you are done tap Next.
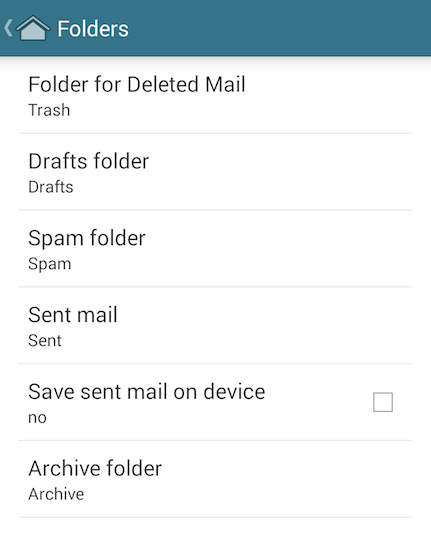
4. Select standard folders on the server
In order to store Drafts, Sent, and Trash messages on the server, you will need to select the server side folders. You can do this when you are in your Runbox account in MailDroid by tapping on the menu icon in the top right and then choosing Settings. Here you will find an option called Folders. Tap on this and you will be shown the screen below.
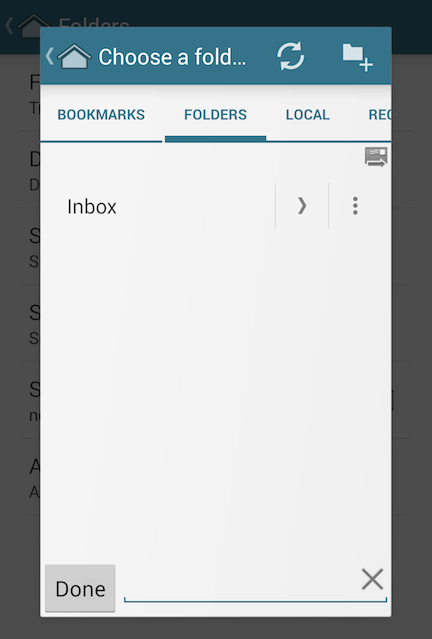
To set up your device so it looks like the screen above tap on menu item in turn. For each of the folders you will be shown the screen below. If you select the arrow to the right of Inbox you will be shown a list of folders in your account. Select the folder corresponding to the folder you are trying to set up in each case.
Once you have done this you have completed set up Runbox in MailDroid.
5. Setting up Identities in MailDroid
It is possible to set up MailDroid so that you can send email from your Runbox aliases (if you have set any up). To do this:
- Go to Settings > Advanced > Identities
- Click “New Identity” at the bottom.
- Enter the alias address and click OK.
- On the page you are taken to click SMTP Settings at the top and choose “Reuse existing settings“. Choose your main Runbox account address as this is what you will log in to the outgoing mail server with even though you are using an alias.
- On the page you are taken back to you can add “Your name” (which could also be a business name if you are using this identity for a business) to be displayed on outgoing mail otherwise recipients may just see your identity/alias address. You can also change other settings such as adding a signature.
- When you are done making changes in Step 5. just click the back arrows to return to the mail interface.
- To select the outgoing identity/alias you want to use when composing or replying to an email tap on the address at the top of the message and choose the one you want to use from the drop down menu.
Note: When setting up identities, we always recommend you send some test messages afterwards to check they sent as you expect and that they are received with the expected details at the recipient end.
That completes the set up of identities in MailDroid.