
On this page we will explain how to install the Enigmail add-on for Thunderbird and how to create your first key pair.
Contents
Before we begin…
If you have not already installed GnuPG/OpenPGP on your computer, then you should go back and do that first before trying to carry out the instructions on this page.
Installing GnuPG on Microsoft Windows using Gpg4win
Installing GnuPG on Apple OS X using GPG Tools (coming soon)
You will also need Thunderbird installed and configured to receive your email. If you need to do that, you can download Thunderbird form the official website.
Installing the Enigmail add-on
To begin with launch Thunderbird on your computer.
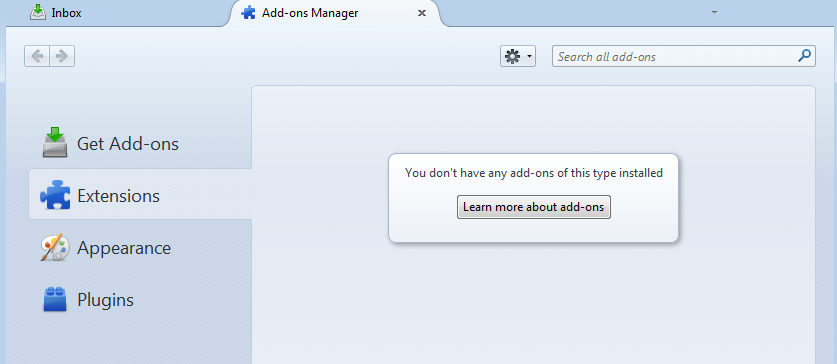
To install the Enigmail add-on go to the menu and choose Tools > Add-ons. You will see the screen below.
In the search area, type “Enigmail” and press Enter.
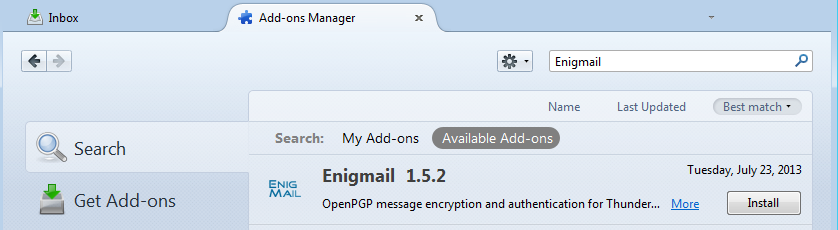
You will be shown a list of add-ons available to download. Enigmail should be near or at the top. Click Install.
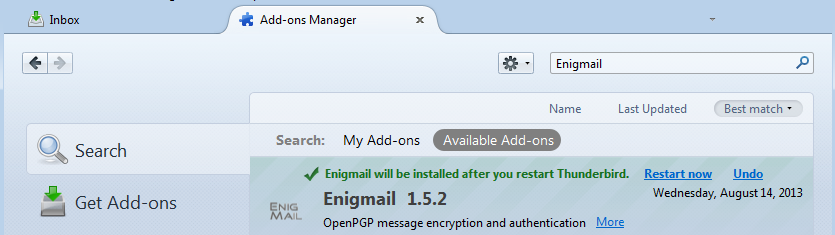
You now need to restart Thunderbird for the installation of Enigmail to be completed. Click Restart now.
Once Thunderbird has restarted, the Enigmail Setup Wizard should automatically start. If it does not, go to the Thunderbird menu and you will see a new menu item. Click on Open PGP > Setup Wizard.
Creating an OpenPGP Key Pair
It is probably worth reminding ourselves what we are about to do. We are going to generate an OpenPGP key pair. It is a pair because there is a private key that you keep safe and never give to anyone else, and a public key you can give to others and upload to a key server so others can find it. The public key is used to encrypt messages to you, and the private key is used by you to decrypt those messages.
Enigmail Setup Wizard
Running the Enigmail Setup Wizard is the easiest way to get Thunderbird ready to encrypt and sign email messages.
In the menu go to OpenPGP > Setup Wizard.
The Setup Wizard is very easy to use and follow, and therefore we are not going to describe each screen you will see in detail.
However, we will provide some notes below to help you choose options as you work through the set up process. The notes assume you have already set up Thunderbird with your email accounts, but are new to encrypting/signing email.
We recommend that you read all of the information on the screens because the information will help you understand what the wizard is doing and you may want to refer back to what you have learned later.
Notes:
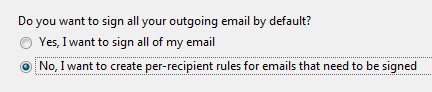
In general signing all email by default is usually a good thing. However, if many of your recipients do not use an email program that is OpenPGP “aware” then it could display your message strangely or in some cases, they will not see your message at all but will find it as an attachment to a message. This could be annoying, so until you are more familiar with OpenPGP and what your recipients can handle it is probably best to choose not to sign all email.
As with signing email, encrypting all email by default is probably not a good idea at this point as many of your recipients probably do not use OpenPGP.

The changes referred to in the window below activate OpenPGP for the email identities in Thunderbird. So go ahead and let it do this.
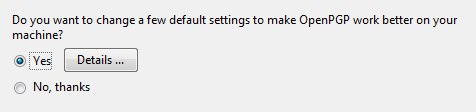
We have assumed you are new to OpenPGP, so you will not have a key and will need to choose the first option here.

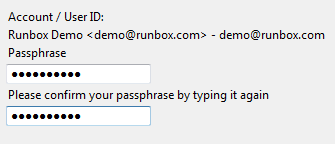
You will be asked to enter a passphrase. The reason you are asked for a passphrase rather than a password is to suggest to you that something longer than a single word password would be desirable. This passphrase along with keeping the private key of your key pair safe is what is going to protect your encrypted and signed emails.
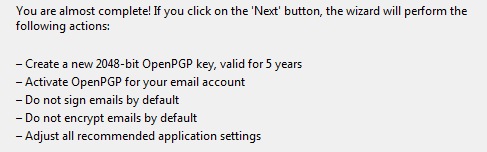
The following screen shows the options that have been chosen. Except for the key length (2048-bit) all of the options can be changed later. A key of 2048-bit length is generally considered to be safe for encrypting email but is regarded by some as the minimum standard. If you want a key that is longer we suggest you don’t use the setup wizard and do some research in to OpenPGP key lengths before making a decision. You can also contact Runbox Support for advice.
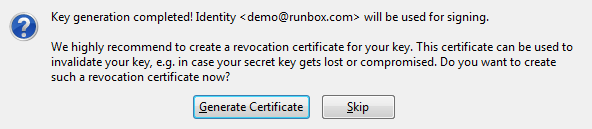
We recommend you generate the revocation certificate and keep it safe separately from your private key.
Trusting Your Key
The whole Open PGP idea works on the basis that you trust that the keys of the people you keep on your system are genuinely from those people. If you don’t trust that the keys are from the people they say they are from then there is no real point in using Open PGP. You can set how much you trust each key as a property of that key.
You should set the trust level of your own key at this point. You created the key so presumably you trust it is yours. To set the level of your key (or any key for that matter). Follow the instructions below.
To trust a key go to Open PGP > Key Management
Select the key you want to trust (yours in this case) and click Edit > Set Owner Trust
It’s your key, so you can choose the Ultimate trust option. Then click OK and you are done.
Adding additional identities (email addresses) to your key
You don’t have to have a separate key for each email address or identity you want to use the key for. You can add additional identities very easily.
To add an additional email address/identity go to Open PGP > Key Management
Select your key and then click on Edit > Manage User IDs
A window will open where you can add additional email addresses to the key. You also have the option to set a primary email address. This is useful if one of your email addresses is known to others more than the others.
When you are finished click Close Window. Each time you add or remove identities from your key, you should upload it to the key server again (see below).
Uploading your public key to a key server
If you are happy with the key you have created (there is not much to be unhappy about unless you spelled your name or email address incorrectly) then you can upload the public key to a key server so that others can find it. You don’t have to do this right away as you might want to try out your new key first to make sure it does what you expect of it.
You should be aware that once a key is exported to a server that it cannot be removed from the server. It can however be revoked and other people searching for your key will see that you don’t intend that key to be used any more.
You might want to revoke you key if the private key is ever lost or stolen. However, it will still not be of any use to anyone (including you) if the passphrase cannot be remembered.
To upload your key go to Open PGP > Key Management
Click on your key in the list, and then go to Keyserver >Upload Public Keys
Other people will now be able to search for your name or email address and download your public key. This lets them send encrypted email to you.
Using your OpenPGP key to send email
Now you have created your key pair, added any additional identities and optionally uploaded it to a key server you are ready to start sending email using it.
We recommend using Thunderbird for this as Microsoft Outlook does not currently have a reliable open source solution for sending encrypted email with OpenPGP.
For instructions on how to use your new keys with Thunderbird, follow the link below.
Using Thunderbird and Enigmail