
To set up Apple Mail with Runbox, please follow the step-by-step instructions below.
Note that the setup process may vary slightly from what is shown here, depending on the version of macOS and Apple Mail you are using.
Note: There is more than one place in macOS where you can set up Internet accounts. Here we do the set up from within Apple Mail itself because the other options required are only shown when setting it up this way.
Contents
1. Getting Started
If you haven’t already, start Apple Mail by using the Dock or the Applications folder on your computer.
Click Mail and then Settings from the main menu of Apple Mail. This will bring up a preferences screen where you should then select the Accounts tab.
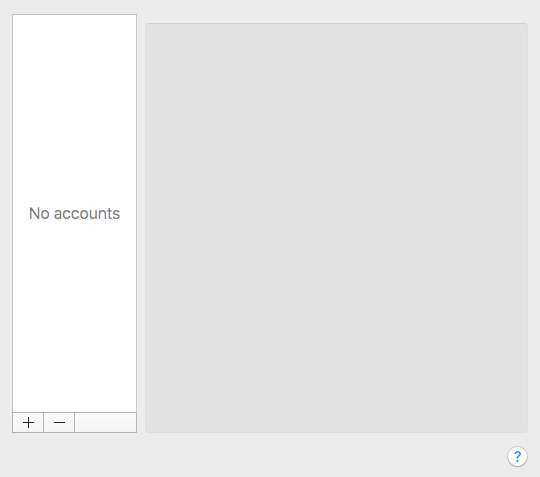
Near the bottom of the screen there are + and – buttons, click on + to add a new account.
You will be shown the screen below:
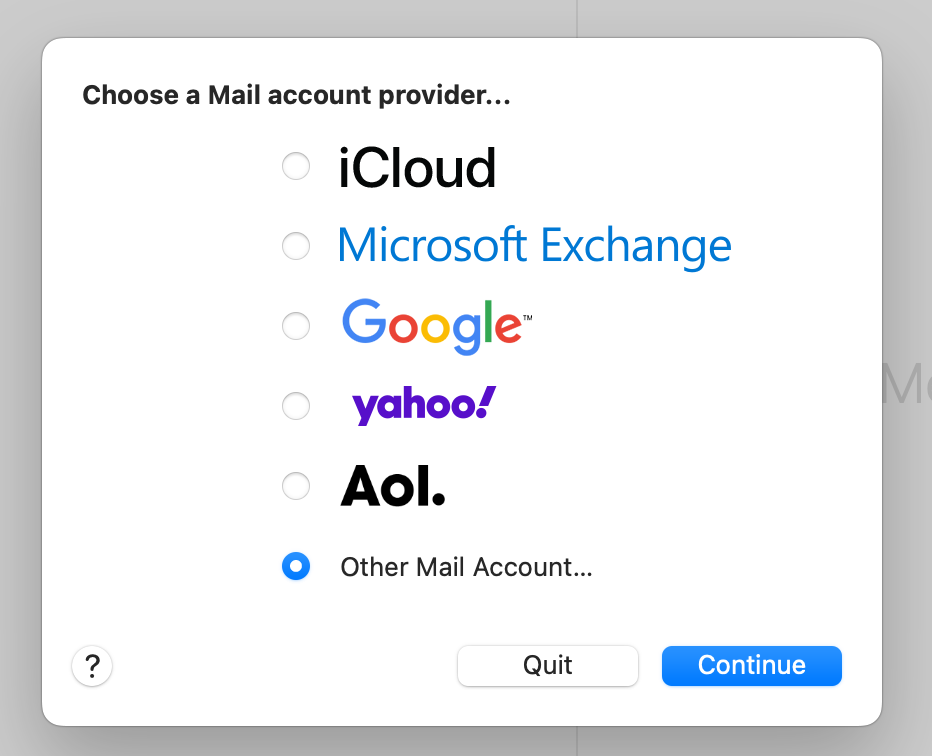
Choose Add Other Mail Account…
2. Enter your personal details
Enter your name, the email address you use with Runbox, and your Runbox account password in the corresponding fields.
Note: If you are using Two-Factor Authentication (2FA) on your Runbox account, you’ll need to use a specific App Password instead of using your regular account password to set up your account with Apple Mail or any other email client.
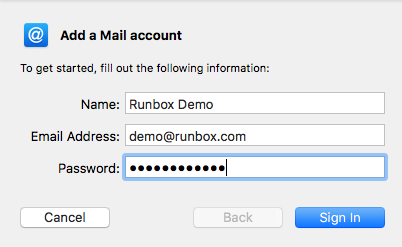
When you click Create you will be told the account needs to be manually configured.
Read more about account security, two factor authentication and app passwords here.
3. Enter the incoming and outgoing server details
Note: You may want to add the incoming and outgoing server names first as Apple Mail regularly loses the username setting after you enter the server details. This means if you enter the username first, you may have to do it again to complete the settings.
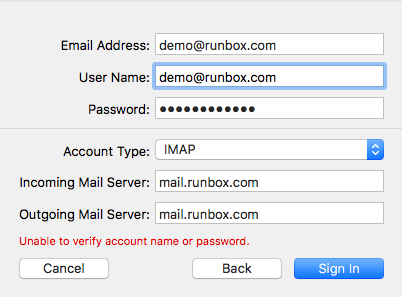
Complete the fields that are empty.
Note: When you first create your Runbox account SMTP (outgoing mail) will be unavailable to you until you either a) validate your alternative email address (we send a validation link there when you create the account) or b) pay for a subscription. If you don’t do either of these things you will get a username/password error when trying to use our outgoing SMTP server.
Incoming Mail Server (IMAP): mail.runbox.com
Outgoing Mail Server (SMTP): mail.runbox.com
Username: your primary Runbox email address (aliases cannot be used as log in usernames)
When you are done click Sign In.
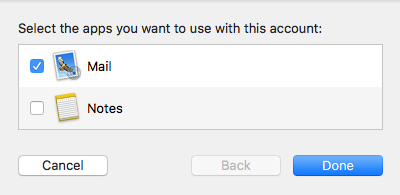
4. Choosing Mail and Notes
After you have successfully signed in you will be given the choice to use your Runbox account for Mail, Notes or both.
If you are just setting up Apple Mail and are not interested in Notes then deselect the Notes option. The Runbox servers will offer limited* support for the Notes app in macOS so you may use this option if you wish.
*The macOS Notes app is able to use an IMAP account like your Runbox account to store notes in your Inbox as emails. This works fine, but does not offer the same level of functionality as Notes can provide when used with Apple’s iCloud service.
5. Select standard folders on the server
In order to store Drafts, Sent, and Trash messages on the server using the Runbox default folders for these you will need to tell Apple Mail which folders to use.
Click on the Mailbox Behaviours tab.
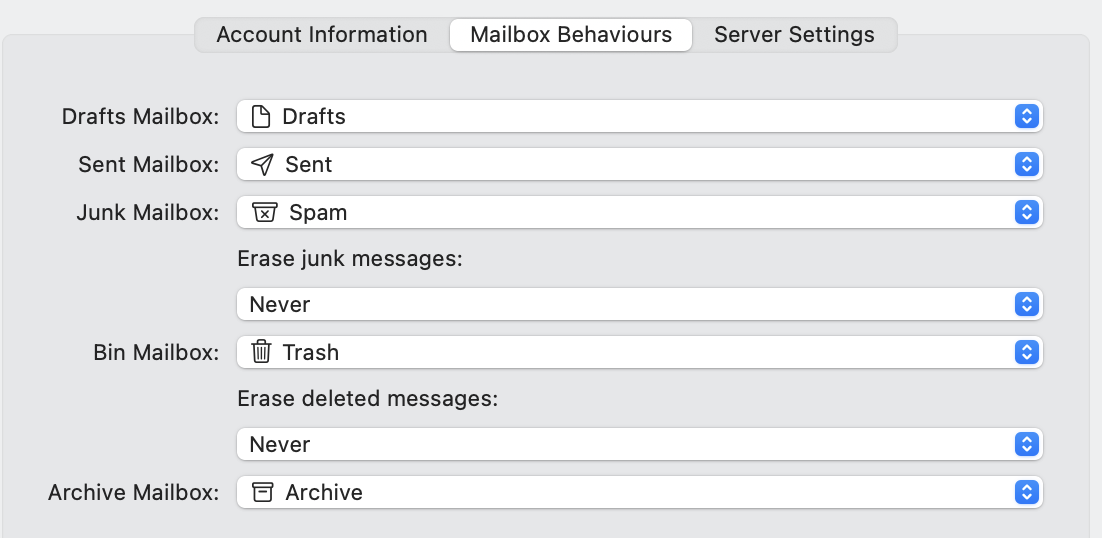
Change the Apple Mail default settings by choosing the correct folder on the server. In particular pay attention to the Sent and Trash mailbox settings that are often set up to use a different name when compared to the name we give them on our servers.
Your Runbox account is now set up with Apple Mail!
6. Customize to Runbox recommended server settings
Click on your new account in the left column and then choose the Server settings tab.
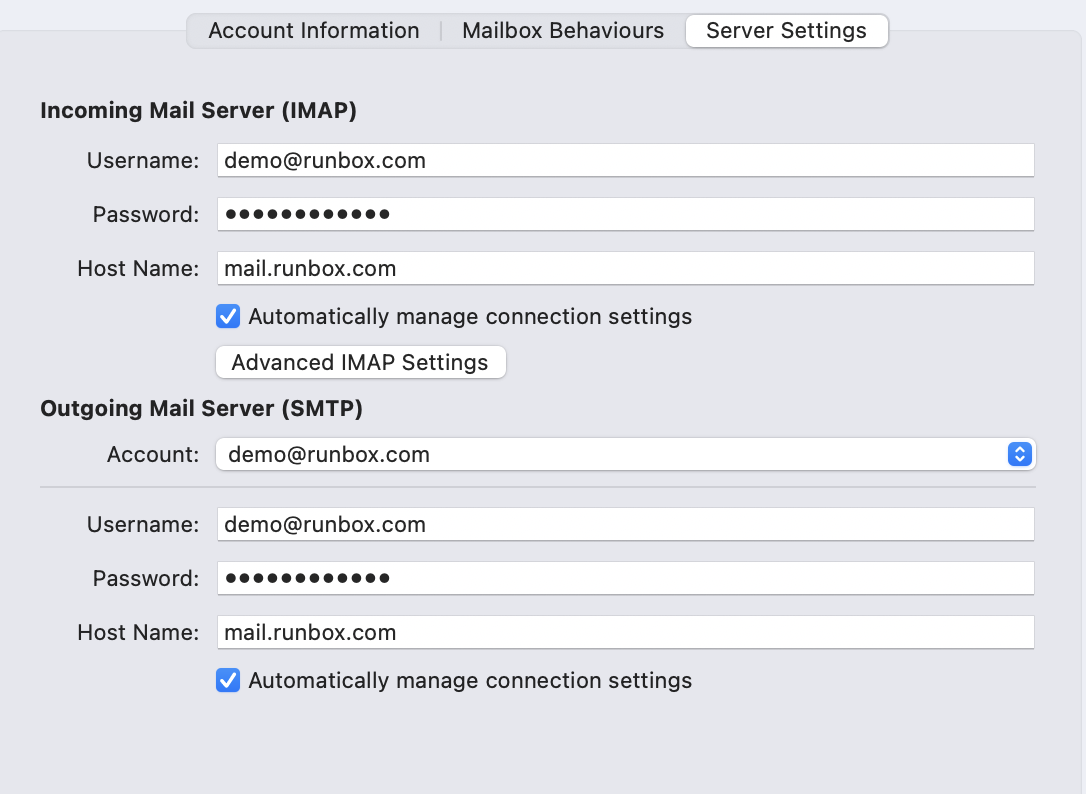
When Apple Mail completes the set up it defaults to port 143 with SSL for incoming mail, and port 587 with SSL for outgoing mail. While these settings will give you an encrypted connection to our servers, for technical reasons we recommend changing these settings as shown below.
De-select the “Automatically manage connection settings” for the Incoming and Outgoing servers. The tab will then change to the one shown below.
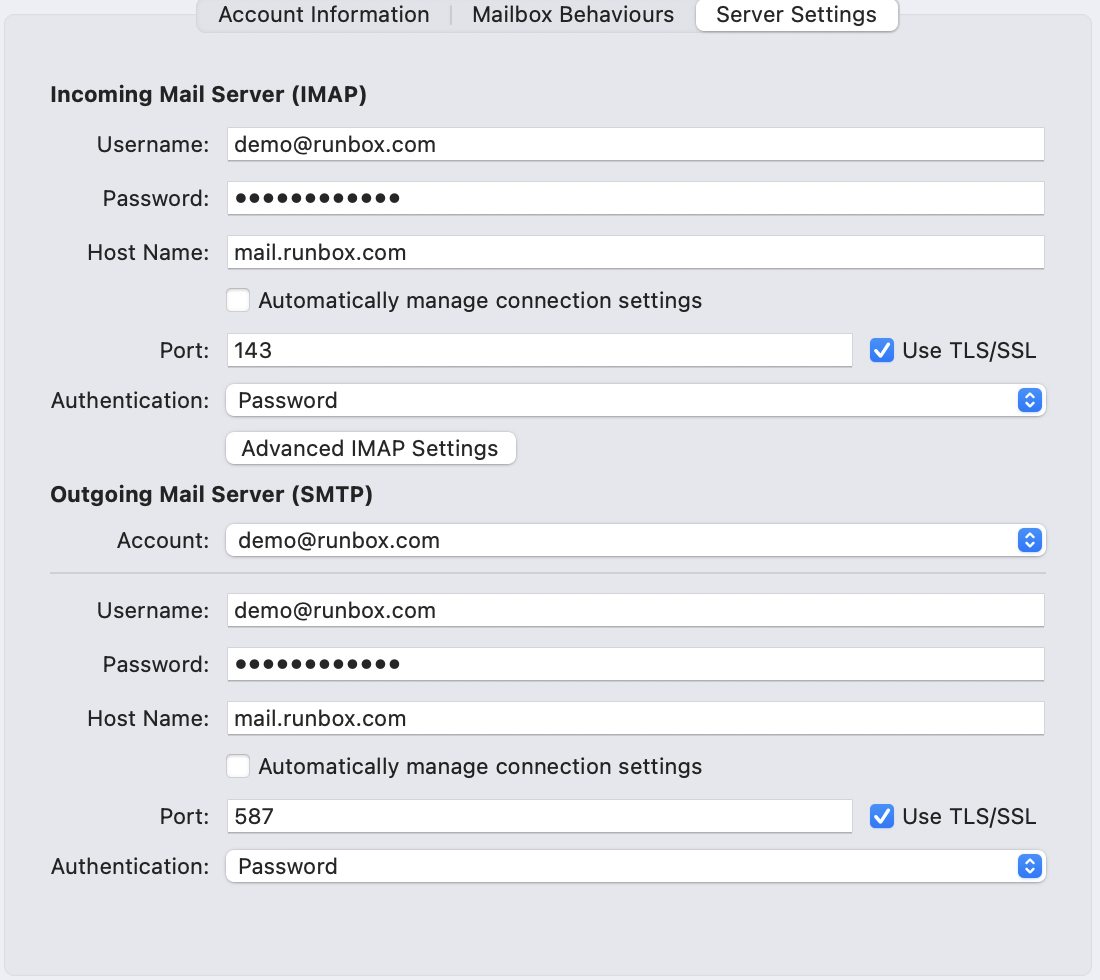
Change the port settings to 993 and 465 as shown below.
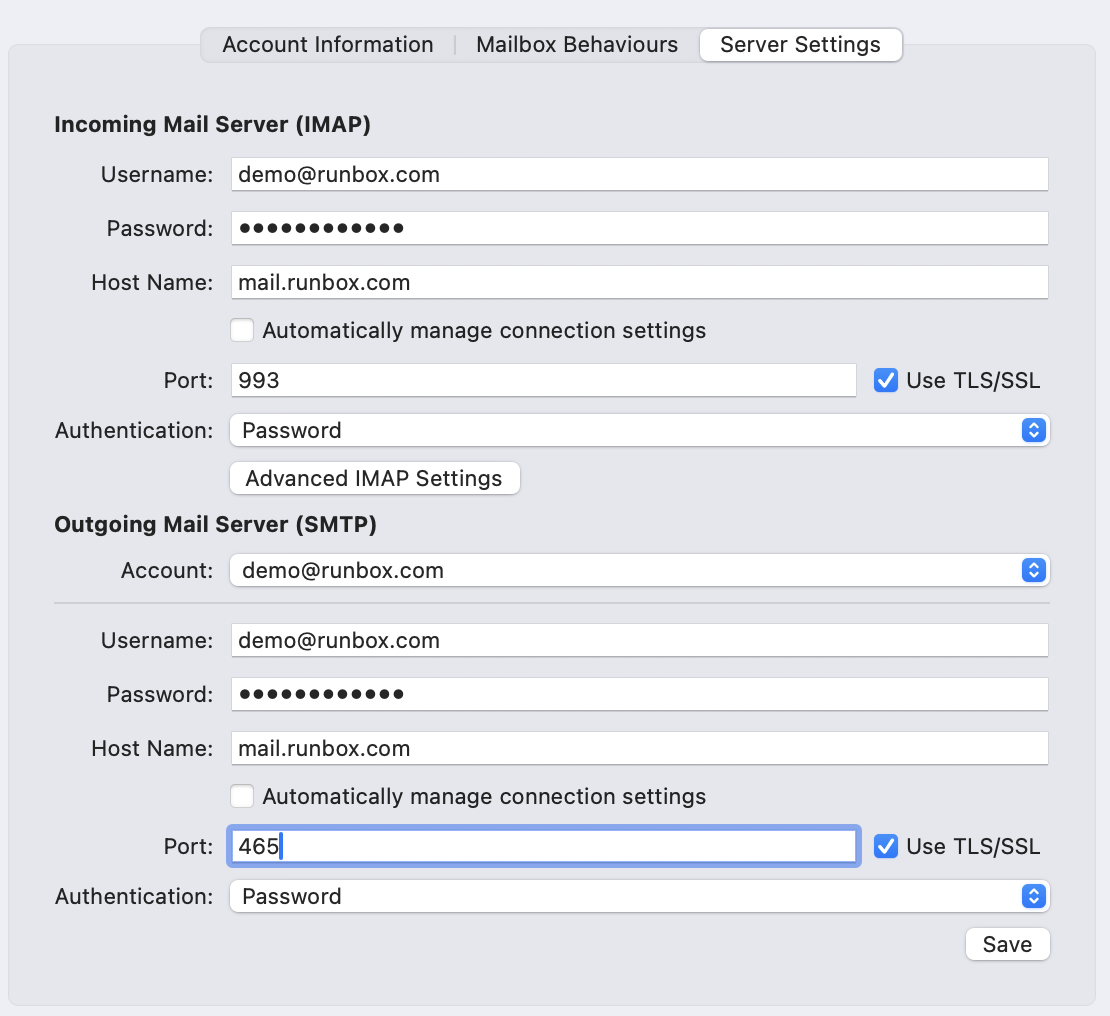
Click Save and Apple Mail will verify the new settings.
7. Optional – Using Identities and Aliases in Apple Mail
Apple Mail has the ability to let you set up different identities and aliases. An identity is a different outgoing name on an account that might also have other different features such as a different signature. An alias is an alternative email address that delivers to another main account address. You can use identities and aliases in any combination as shown in the examples below.
Example 1: Different identity but same address
Runbox Demo Second Identity <demo@runbox.com>
Example 2: Same identity alias but different alias
Runbox Demo <my.alias@runbox.com>
Example 3: Different identity and different alias
Runbox Demo Second Identity <my.alias@runbox.com>
You might use use Example 1 if more than one person shares the same email address, but you want outgoing email to show which person sent the message. Example 2 might be useful for things like online shopping where you want to show you real name but don’t want to use your main email address in case you start receiving marketing emails. Example 3 might be useful in a number of situations. If two people share an account but have individual email address, or if you also run an business and combine your personal and business email in the same account.
Whatever you use identities and aliases for, Apple Mail can help. Follow the instructions below to see how to set up identities with aliases.
With Apple Mail open, go to Mail > Preferences and choose the Accounts tab.
On the Account Information tab you will see a drop down menu called Email Address. If you click on this drop down menu you will see a list of aliases as well as the option to edit them.
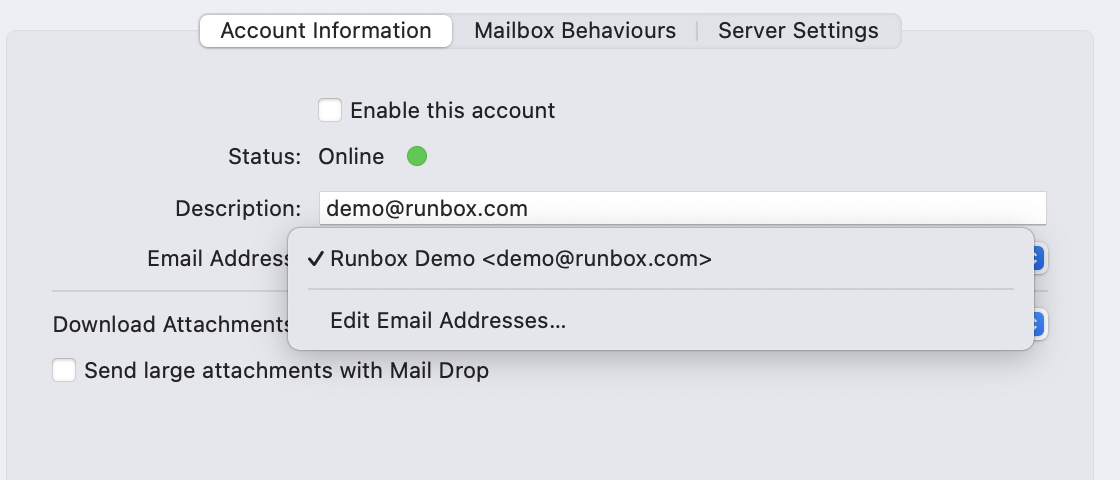
If you click on Edit Email Addresses you will be taken to a new screen.
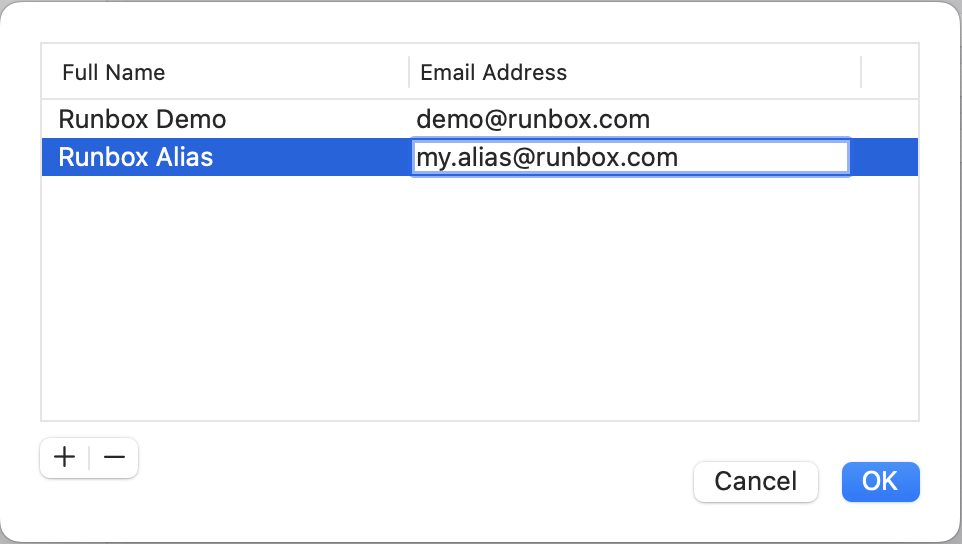
Here you can add more aliases. When you are done click OK.
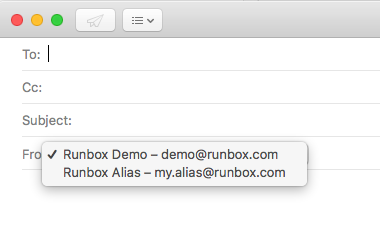
Identities/Aliases will be available to you when you compose messages in a drop down menu.
If you need any further help in configuring Apple Mail, please contact Runbox Support.